Sunday, October 17, 2010

An Iron Chef's Macaroni and Cheese

Oh Michael Symon, how you have captured the hearts of Clevelanders and now the world (or at least the entire Food Network viewership). On a recent trip to Lolita in Tremont, Chase and I had once again a great experience at a @chefsymon restaurant. Lolita is welcoming, with warm colors, natural textures and a comfortable atmosphere, which we fully enjoyed. With an open bar/kitchen where you can watch some of your food being made, Lolita is a great place to meet friends for happy hour or take your one and only for a much needed date night. From delicious small plates, such as crispy chicken livers (don't be afraid, the best appetizer I've had in a long time, I promise!) to cured meats, Lolita has many options for all different tastes.

The Cleveland Iron Chef's Macaroni and Cheese
In my life I would have to say that no matter the person I've come across, everyone has loved macaroni and cheese. I'll have to admit that I have never been a fan of the typical boxed mac n'cheese. I've often found myself adding a can of stewed tomatoes and chopped up bacon (my mom's secret recipe), anything to hide that powdered cheddar cheese...iiccckk! So if you haven't already tried to make your own macaroni and cheese, here is my endorsement. You can do it! Make it rich, creamy and worth every penny!

At many Michael Symon restaurants you can indulge in the creamiest of mac n'cheeses. Made with local goat cheese and savory chicken, this is not your typical macaroni and cheese (thank god!).  This is a published recipe so I'll have to admit it was easier for me to recreate this meal. Here is the recipe:


6 (6-ounce) boneless skinless chicken breasts
2 tablespoons Hungarian paprika
1 tablespoon kosher salt and freshly ground black pepper, to taste
2 tablespoons olive oil
1 quart heavy cream
2 tablespoons of fresh rosemary
2 pounds of cooked rigatoni or other favorite pasta
6 ounces Lake Erie Creamery goat cheese (or your local favorite)
  1. Season chicken breasts with paprika salt and pepper and set aside
  2. Heat olive oil in large saute pan and place chicken in it browning on both sides
  3. Place in 400-degree oven for 8 to10 minutes
  4. Remove from oven and let cool then dice into large pieces
  5. Heat cream in large saucepan, add herbs, salt, and pepper and reduce by half
  6. Add the cooked pasta, cheese and cooked chicken and simmer for 2 minutes
  7. Remove from heat and serve.

The Macaroni and Cheese I made from the above recipe
So step out of the traditional mac n'cheese box and try this exceptional recipe. I promise you will enjoy (even my mother who doesn't like goat cheese did).

Sunday, October 3, 2010

Garden Gazpacho

G A Z P A C H O... the word sounds so foreign and unknown to many of us. A usually tomato-based, cold vegetable soup, gazpacho is a great escape from your every day meal. Recently, I had the pleasure of taking a personal trip to AMP 150 Bar and Restaurant, searching for blog inspiration. The entire meal was a taste bud fiesta, filled with amazing dishes that truly entertained AMP 150's "farm to table" promise. A true experience, I honestly enjoyed all three of my courses, taking two and a half hours of time to myself, indulging and savoring every bite.
Garden Gazpacho at AMP 150
For my first course I chose the garden gazpacho. It came highly recommended by my very kind and helpful waitress and I really hadn't had gazpacho in years. I was in love with the presentation, a great start to any meal. Opening the jar filled with luscious golden gazpacho, adding as much olive oil breadcrumbs and shrimp escabeche as I wanted, was a fun and entertaining experience.

Then came the first bite...wow! What complex flavors! The fresh veggies, the acidic vinegar, I loved discovering this gazpacho, unfolding it layer by layer.

At that moment I knew I had to try to recreate this delicious soup.

After doing some research into the different kinds of gazpacho, and pondering on the tasty flavors of the garden gazpacho at AMP 150, I've created a garden gazpacho recipe that I am proud of. To make this gazpacho I wanted to use fresh veggies from Pickering Hill Farms Market in Avon, these would be the base of my soup. Such beautiful, ripe colors, and fresh basil. Instead of just using plum tomatoes, I decided to use some heirloom tomatoes as well.
The fresh veggies and basil for the garden gazpacho

Here is what you will need to recreate AMP 150's amazing garden gazpacho at home:
  • 2 sprigs of fresh basil leaves, or 1 1/2 tablespoon of dried basil
  • 1 tsp parsley
  • 1 tsp cumin
  • 1 tsp paprika
  • 1 tsp salt
  • 1 tsp pepper
  • 1 green pepper
  • 1 large cucumber
  • 3 plum tomatoes
  • 3 heirloom tomatoes
  • 3 cloves of garlic
  • 1/3 cup rice wine vinegar
  • 1/2 cup olive oil
  • 4 slices plain white bread, take off the crust, soak in water and then squeeze out the water

Cut the veggies into large pieces and put everything above into a food processor and turn it on until all of the ingredients get thoroughly chopped and blended together. If you have a smaller food processor you may have to split the recipe in two or four to blend together, but not a problem, work with what you have. You can also use a blender, but chop up the veggies smaller before you blend them. Put all of the blended gazpacho into a container and put in the fridge for at least an hour or overnight if you can.

While your gazpacho is cooling you can make breadcrumbs, which add a great pop and crunch to the soup.  Either cut up crusty italian/stale white bread into cubes, place on a baking pan and cover in olive oil, baking on low broil until golden brown on all sides, then place in food processor and grind up. Or you can get classic croutons and put them into the food processor and grind up as well. If you are a fan of shrimp like I am, just get a bag of frozen tiny shrimp, de-thaw, pat dry with a paper towel and add to your gazpacho. Serve cold from the fridge, and add the breadcrumbs and shrimp to your taste. Enjoy!
My Garden Gazpacho presentation!

Sunday, September 19, 2010

Jambalaya, your new game day grub

Chef JR seasoning his crawfish boil
At the Taste of Cleveland I was lucky enough to enjoy a food demo with Cleveland's Fat Fish Blue Chef Gary "JR" Grady, Jr. Although the highlight of my entire day was the delicious crawfish boil (not in season, I will have to grace you with my family's crawfish etouffee recipe in a future post),  Chef JR's jambalaya recipe inspired me to take this southern classic and make it for a Cleveland game day. 


Football season is upon us, so I figured it would be appropriate to give you a tasty and easy recipe to share with family and friends while watching the game. I decided to make my jambalaya in the slow cooker. Slow cookers are very handy and one of the best ways to create a flavorful meal with little hard work.


The jambalaya will take about 6 hours to cook in the slow cooker. Prep the night before, or when you wake up on Sunday morning and you will have a great meal to eat during the game or for dinner afterwards.


Jambalaya, here is what you'll need for a large slow cooker (about 5 quarts):

  • 2 large chicken breast, cut into cubes
  • 1  pound  smoked sausage,  cut into slices (other options include ground italian sausage)
  • 1  large onion, chopped
  • 1  large green bell pepper, seeded and chopped
  • 3  stalks celery, chopped
  • 1  (28 oz.) can diced tomatoes with juice (I suggest the recipe ready kind with oregano, onions and garlic included)
  • 3  cloves garlic, chopped
  • 2  cups chicken broth
  • 1  tablespoon Cajun or Creole spice mix (or you can just add some hot peppers, chili powder, and old bay seasoning to add a good kick as well)
  • 1  teaspoon oregano, parsley or thyme
  • 1  pound shrimp, peeled and deveined if fresh (or to save money you could get the canned tiny shrimp)
  • 2  cups instant rice (I suggest whole grain, because it is healthier and you won't notice the difference)
  • Salt & pepper to taste

My jambalaya, my family loved it, and I'm sure you will too!
After prepping all of the ingredients, all you have to do is add everything (except the shrimp and rice) into the slow cooker, turn on low, add the lid and walk away. That easy! Five hours later come back to your jambalaya, give it a good stir, add shrimp and rice, and crank up to high for a half an hour. After that half hour is up serve the piping hot goodness into large bowls and dig in. Everyone will love it, and feel free to be creative, customize it to your taste and make it your own.

Bon appetit!

Sunday, August 29, 2010

Garfunkeling Fries

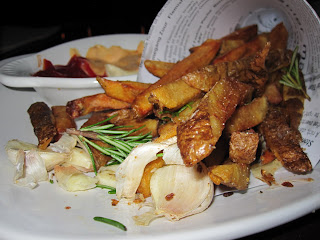
The Bier Markt pomme frites
You may be asking yourself, "Garfunkeling fries? What the hell is this girl talking about?" Well this is how it all began. To avoid sitting in the rain at a recent Browns preseason game, Chase (the boyfriend) and I decided to head down to The Bier Markt in Ohio City to watch the game and eat. Gladly, we decided to try their fries.  I am a big fan of well-seasoned fries, with a delicious aioli to dip and enjoy the salty treats in. With this boost of inspiration I decided to tackle the challenge of making my own fries.

But incase you don't know me, I don't like to do anything that is usual or expected. So in trying to decide how to make french fries unique, Chase, Jocelyn (the friend, a.k.a. Jocy-kat), and I found ourselves in a conversation that flowed like this: love for Flight of the Conchords>the Simon and Garfunkel spoof of FOC>Parsley, Rosemary, Sage, and Thyme>all of these herbs being great with fries>making french fries inspired by Simon and Garfunkel.

Alright, now that that is clear, I bought all of the necessary herbs, potatoes, garlic and I was ready to cook! So making french fries is really not as hard as it seems. First preheat oven to 400 degrees, wash your potatoes (the same kind you make mashed potatoes with is fine) and cut into strips, I realized having them a nice medium thickness is best, not too thin and not too thick. Next, get out your frying pan and cover the bottom of the pan with about a 1/2 inch of olive oil, add rosemary, parsley and lightly chopped garlic cloves to the oil and turn that baby up to high. Once the oil starts to bubble, wait a minute and then put the fries into the oil making sure that all of the fries touch the bottom of the pan. Toss the fries around after a minute, making sure that all sides are getting a nice crispy coating. After the fries have gotten a nice golden crisp in the frying pan put them on a baking sheet and into the oven for 10 minutes. Take out and toss with some salt and pepper.

Garfunkeled Fries!
Now to complete the Garfunkeled fries, you must dip them in this special aioli. To keep it simple, add 2 tablespoons of mayo to a food processor, along with a half teaspoon of sage and thyme (fresh or dry). Then strain the rosemary and garlic out of the oil in the frying pan and add to the food processor and turn on until the mayo and spices have mixed evenly. Dip your fries and enjoy!

Wednesday, August 18, 2010

Inspiration

Inspiration is the key to creativity, and in my opinion creativity is essential in great cooking. Welcome to my blog! Cooking Cleveland will feature dishes that inspire me to recreate them and make them accessible for the every day cook. I love the Cleveland food scene and have been motivated to experiment and see if I can really cook great dishes like the ones I love to enjoy. There is a big difference between loving, enjoying and appreciating great food, and truly understanding how to create and envision a dish from it's inception. This blog will be a journey to find great ingredients, learn about cooking techniques, and explore the possibilities of food. Hhhhmmm now what do I want to tackle first?... The Greenhouse Tavern's Pommes Frites or Parkview's Chipotle Pork Tacos [two of my favs ;)], I guess we shall see....delicious food soon to come!